Saturday, April 13, 2024

Really Reasonable Ribbon Blog Hop - April 2024


Welcome to the Really Reasonable Ribbon April Blog Hop! Our hop theme this month is Mother's Day and/or Flowers. Each of the design team ladies is going to be creating a project in this theme or style, using ribbon

You should be coming to my blog from Ginny's Blog. After visiting me hop on to Kathy's Blog next! (The full blog list is at the end of the post.)

At the end of the hop, comment on the RRR Blog post, answering the question listed, for a chance to win a $10 Gift Card to the RRR Shop, plus one digital stamp set of your choice from Bonnie Garby Designs. The Design Team appreciates your comments, too!

I lost my mom in 2015, but still I try to make a card in colors that she used to enjoy. She loved blue, so I incorporated blue ribbons into the card I made to share today. I mostly donate the Mother's Day cards I create, which brings me joy and spreads joy to others. 

I made a 5" x 6 card base from a dark periwinkle cardstock that I found in my stash of 8 1/2" x 11" cardstock; which I have been trying to use because it is taking up too much space in my craft room! I used Graphic 45 Cottage Life and Botanical Tea papers and images. 

I created the sentiment on my computer and printed it out, then used some sentiment strips die cuts to trim out the greeting. 

I used lots of layers for the card, including two banner shapes cut from printed paper and coordinating cardstock. 

The ribbons used are 5/8" Capri Blue Taffeta and 3/8" Capri Blue Swiss Dots Satin. I love when I find coordinating ribbons in my stash! I created bows, which I glued to the card. I topped the bows with a large pink button tied with a piece of Baker's Twine.

I didn't care for how my bows were looking, so I decided to add some paper flowers, too. I used Mixed Pink Peony Flowers, which I deconstructed and then put back together to make smaller buds.

I used a leaf die to cut some leaves from scraps of green cardstock. 

I added some enamel dots here and there as well to finish the card. I did line the inside of the card with off-white cardstock, making it ready for stamping or writing an inside greeting.

Thanks for joining me today! Have fun hopping!

Here is the RRR Blog Hop Order in case you get lost!
Really Reasonable Ribbon's Ramblings
Ginny
Gloria - YOU ARE HERE!
Kathy
Cheryl
Bonnie
Misty
Karen
Really Reasonable Ribbon's Ramblings


Really Reasonable Ribbon Supplies Used:
Bow making tools: Zutter Bow-it-All

Other Supplies Used:
Cardstock: ColorMates Smooth Natural, blue and green unknown
Paper: Graphic 45 Cottage Life, Botanical Tea
Stamps: computer generated by me
Ink: Stampin' Up Old Olive (to ink the leaves)
Enamel dots: Simple Stories Enchanted
Die cuts: My Favorite Things Fishtail Stax and Layers, Frames; Cherry Lynn Flourish Leaf
Button: my stash
Adhesive: Art Glitter Dries Clear Glue, hot glue, foam tape
Other tools: paper trimmer, scissors, score board

Tuesday, April 02, 2024

Triple B Challenge - April 2024

Hello! Some fun news this morning! I am going to be joining Darlene and Diane for the Triple B Challenge each month! Triple B is a card challenge that is all about Birds, Butterflies, and Blooms! Plus, each month there is an Inspiration Board to help you get your creative juices flowing! 

Darlene asked me to join them in creating an inspiration card each month, just for fun. I have pretty much retired from the design team world, at least for now, but I like to have a little something to give me some incentive to make cards for my stash. The odd guest spot or little challenge like this is perfect for my life as it is currently. So, huge thanks to Darlene and Diane for inviting me!

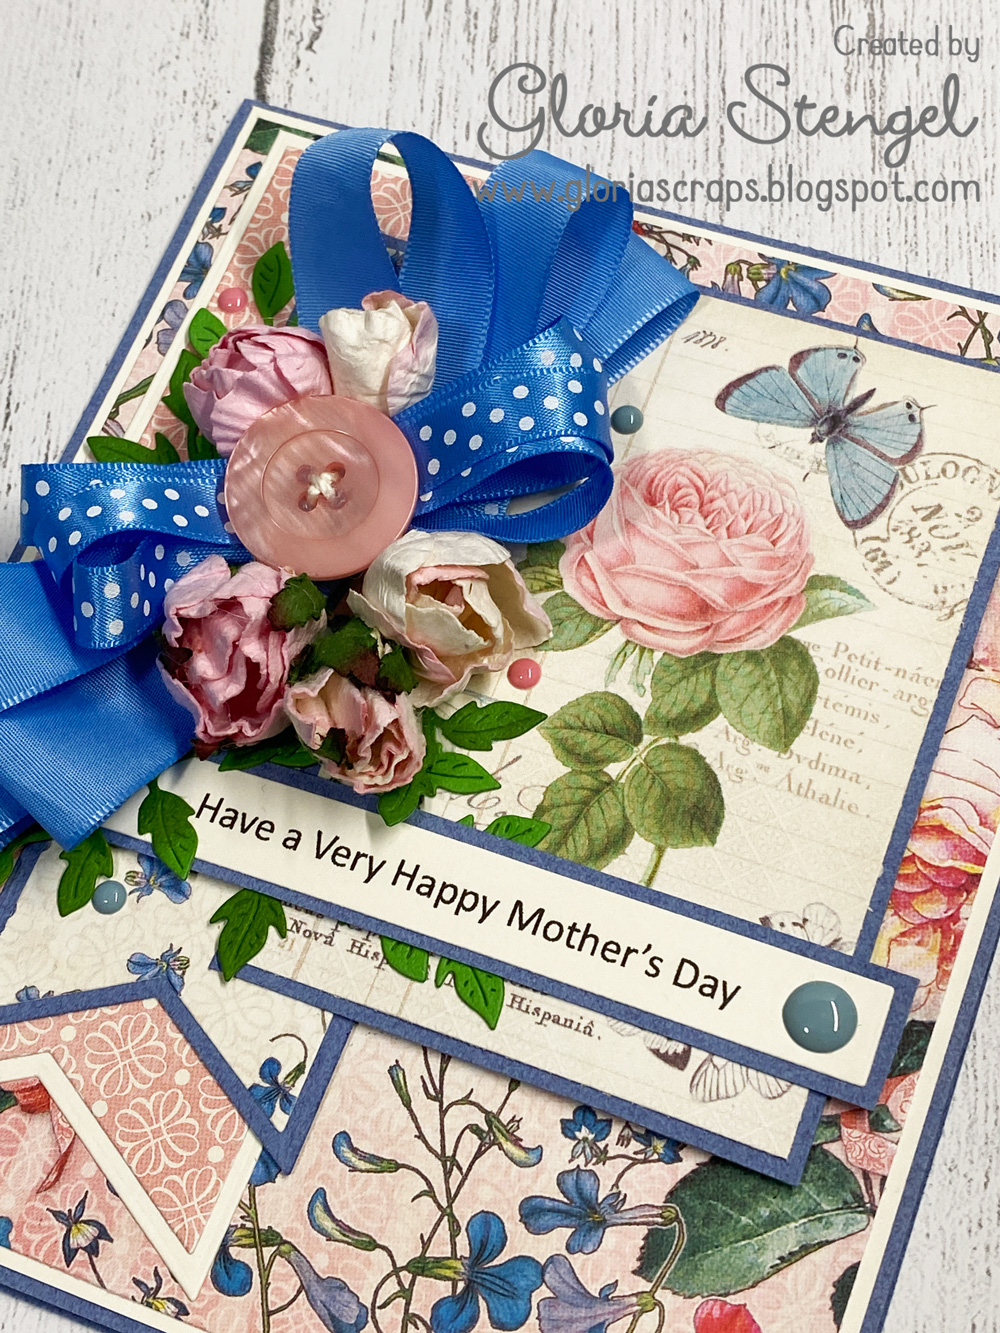
Here is your inspiration board for April. Isn't this beautiful?!! I had so many ideas for this challenge! I have a container of paper labeled "Birds, Bugs, Fish." I pulled that out and picked through it for some inspiration for my card.

Once I decided on my papers, I sketched out a card idea, then selected the elements I wanted to use from my stash of embellishments. It is often hard for me to narrow things down because I just have so much stuff! Trying to use up this stash is a monumental task! But I am trying! {smile}
This is the card that I ended up with. I aimed for the soft colors of the inspiration board, trying to focus on the pale pinks and grays. I totally wanted to go vintage with my card, but I actually chose a more trendy paper pack! This paper is from the Authentique Dreamy collection. The soft colors in some of the papers, plus that lovely butterfly paper, just sold me! 
The card is 5" x 6" and made from off white cardstock with gray accent cardstock to make the printed papers pop. This size card fits into an A6 envelope, in case you are wondering. However, with this much embellishment, I would mail this in a padded envelope, a little box, or something to protect the flowers. 

The sentiment if from the My Favorite Things Rainbow Greetings set. I have had this set for a while and don't think I have ever used it until today. Well, maybe I used it once before. Shocking, I know! {giggle}

I added some of the butterfly paper and another sentiment to the inside of the card. I really like stamping in the gray ink! However, my ink pad was really dry...time to order an ink refill. Hopefully it is still available! That is the problem with an old stash...things get discontinued or the company goes out of business! If anyone has a recommendation for a great gray stamping ink, let me know in the comments! 
I added a bit of lace to the card, then assembled a big flower cluster. These are all pre-made flowers from my stash. I like making my own flowers, but sometimes it just takes so much extra time! I did die cut the leaves from some random green cardstock, so that is a plus. 

Note on the lace: Really Reasonable Ribbon is down to just a few styles of lace and has no plans to restock. If you are looking for lace, you will need to check your local stores, thrift stores, or scour online shops. Lace in card making is not popular right now, so sourcing it can be a challenge. I have a nice stash, but it makes me sad to run out! This style I am sharing today is the LAST of it in my hoard! 


Thanks for joining me for my FIRST Triple B Challenge! 

Remember you do NOT have to follow the board as it is just for inspiration, BUT YOU DO have to use 1, 2 or 3 of the B's ... Birds, Butterflies, and/or Blooms.

Now it's YOUR turn, so pull out those stamps, dies, stencils, or whatever other goodies you have in your stash and have some fun with us.

We won't always have a prize but periodically we will, you just never know! To link up your challenge project, click on THIS link to take you to the Triple B Blog
 
Challenge ends: 8 PM April 30th     
Winners announced: May 2nd.

You can read all the rules in the rules tab on the Triple B  Blog.


Cardstock: CutCardStock Flafours Gourmet Smoked Sea Salt, ColorMates Natural
Printed paper: Authentique Dreamy
Stamps: My Favorite Things Rainbow Greetings
Ink: Memento London Fog; Close to My Heart Heather, Pink Carnation; Stampin' Up Mellow Moss
Flowers: Petaloo Penny Lane Antique Rose; Prima (gray roses); Large flower with wood center unknown, Really Reasonable Ribbon Ivory Rose Buds, Two-Tone Baby Pink and Ivory Sweetheart Blossoms
Lace: Really Reasonable Ribbon Crochet Lace (style I used is out of stock) 
Dies: Cheery Lynn Flourish Leaf, Heartfelt Creations Ornamental Tags
Adhesive: Hot glue, Art Glitter Glue, Scor-tape, ATG
Tools: ink daubers, trimmer, score board, MISTI stamp platform


Wednesday, March 13, 2024

Really Reasonable Ribbon Blog Hop - March 2024


Welcome to the Really Reasonable Ribbon March Blog Hop! Our hop theme this month is SPRING AND EASTER. Each of the design team ladies is going to be creating a project in this theme or style, using ribbon

You should be coming to my blog from Ginny's Blog. After visiting me hop on to Kathy's Blog next! (The full blog list is at the end of the post.)

At the end of the hop, comment on the RRR Blog post, answering the question listed, for a chance to win a $10 Gift Card to the RRR Shop, plus one digital stamp set of your choice from Bonnie Garby Designs. The Design Team appreciates your comments, too!

I have been interested in playing with some of my word art stamps lately, because some friends of mine have been sharing cards for a new challenge blog called Word Power: A Challenge Blog Using Sentiments. It is such a great idea for a challenge! (Sneaky information....I am going to be a guest DT over there in May!) Anyway, I pulled out more of my word art stamps for my RRR card today!

The card is a 5" x 6" top fold card. I used an old, unmounted rubber stamp from Taylored Expressions called Graphic Greetings: Redeemer. I love this style of word art and this message is perfect for Easter...or any time of the year!
The paper is some scraps from some of the Authentique Easter collections, but I am not sure which ones. I had a bunch of scraps in a bag, and didn't feel like matching them up to any particular collection. You know how we do...just toss scraps around willy nilly. 
The ribbon is 5/8" Pearl Pink Delicate Stitched Satin. I wrapped some ribbon around the bottom of the panel before attaching the panel to the card front. Then I created a loopy bow to glue onto the circle element on the card. I sort of wish I had scooted the wrapped ribbon up a bit to be even with the center of the bow, but....ah well. 
The decorative elements are the cute doily cut using an Elizabeth Craft Designs Elements: Small  Doilies die, and the pink enamel dots. I am not sure which company those dots are from as the packaging was missing. I enjoyed making this pink card, all ready for spring and Easter!

Thanks for joining me today! Have fun hopping!

Here is the RRR Blog Hop Order in case you get lost!
Really Reasonable Ribbon's Ramblings
Ginny
Gloria - YOU ARE HERE!
Kathy
Cheryl
Bonnie
Misty
Karen
Really Reasonable Ribbon's Ramblings

I am entering this card into these challenges:
Word Power #3
Word Art Wednesday - Weeks 639-640


Really Reasonable Ribbon Supplies Used:
Bow making tools: Zutter Bow-it-All

Other Supplies Used:
Cardstock: ColorMates Smooth Brown, Natural
Paper: Authentique Easter scraps
Stamps: Taylored Expressions Graphic Greeting: Redeemer, PSX Happy Easter (1998) - inside
Ink: Memento Rich Cocoa
Enamel dots: from my stash
Die cuts: Heartfelt Creations Rectangle and Basics, Circle Basics Large, Eyelet Circle and Basics Small; Elizabeth Craft Designs Everyday Elements: Small Doilies
Adhesive: Art Glitter Dries Clear Glue, hot glue, foam tape
Other tools: paper trimmer, scissors, score board

Tuesday, February 13, 2024

Really Reasonable Ribbon Blog Hop - February 2024


Welcome to the Really Reasonable Ribbon February Blog Hop! We have a ANYTHING GOES...WITH RIBBONS AND BOWS HOP this month...each of the design team ladies is going to be creating a project in any theme or style, using ribbon

You should be coming to my blog from Ginny's Blog. After visiting me hop on to Kathy's Blog next! (The full blog list is at the end of the post.)

At the end of the hop, comment on the RRR Blog post, answering the question listed, for a chance to win a $10 Gift Card to the RRR Shop, plus one digital stamp set of your choice from Bonnie Garby Designs. The Design Team appreciates your comments, too!

I am back to my "normal" self today, sharing a standard A2 card! {smile} I love "anything goes" challenges because I sometimes get a good idea, but then I need to squeeze it into whatever the challenge theme is supposed to be, plus remember to add ribbon! My life is so hard! {giggle}

I have about 200 pounds of 6x6 paper pads in my stash. I know, it is crazy town. I almost never use it, but last year I organized all of it and made it easier to access, in the (hopefully not vain) hope that I would use some of the pads. I pulled some out for this card, and then ended up making several cards with what I had put on the desk. (Those cards are for later, so wait for them to pop up on the blog.) 
The card is an A2, made from dark brown cardstock. I don't know what paper collection this paper is from as it was with a stack at the front of the storage bin. It was something that got "lost" from its pad, I guess. But, it is pretty and reminded me of Valentine's Day or spring so I used it. I am pretty sure the papers are from different collections as well, but who knows for sure??!

The stamp is from Verve Stamps, Proverbs 31:25. I stamped the word art with brown ink and then used an ancient Spellbinders die to cut it out. I think the die set is called Romantic Rectangles and is probably over ten years old! I smudged the edges of the die cut with Spun Sugar Distress Ink. 

Now, for the ribbon part of "anything goes with ribbons and bows"! I used a piece of 5/8" Ivory Satin with Grosgrain Edge ribbon to wrap around the seam between the two different paper patterns. Then I used 5/8" Brown Diamond Satin ribbon to tie the bow. I glued the bow onto the card with hot glue, my go to method! 
I even decorated the inside of the card with some of the paper. So pretty! 
I think this card will be great to send to a girlfriend to give her some encouragement! 

Thanks for joining me today! Have fun hopping! 


Here is the RRR Blog Hop Order in case you get lost!
Really Reasonable Ribbon's Ramblings
Ginny
Gloria - YOU ARE HERE!
Kathy
Cheryl
Bonnie
Misty
Karen
Really Reasonable Ribbon's Ramblings

I am entering this project into the Word Power #2 Challenge Blog. 


Really Reasonable Ribbon Supplies Used:
Bow making tools: Zutter Bow-it-All

Other Supplies Used:
Cardstock: ColorMates Smooth Brown, Natural
Paper: unknown 6x6
Stamp: Verve Stamps Proverbs 31:25
Ink: Memento Rich Cocoa, Ranger Distress Spun Sugar
Die cut: Spellbinders Romantic Rectangles
Adhesive: Art Glitter Dries Clear Glue, hot glue, foam tape
Other tools: paper trimmer, scissors, score board

Saturday, January 13, 2024

Really Reasonable Ribbon Blog Hop - January 2024


Welcome to the Really Reasonable Ribbon January Blog Hop! We have a THEME HOP this month...each of the design team ladies is going to be creating a project using Valentine's Day colors and themes

You should be coming to my blog from Ginny's Blog. After visiting me hop on to Kathy's Blog next! (The full blog list is at the end of the post.)

At the end of the hop, comment on the RRR Blog post, answering the question listed, for a chance to win a $10 Gift Card to the RRR Shop, plus one digital stamp set of your choice from Bonnie Garby Designs. The Design Team appreciates your comments, too!

I have not participated in the RRR hop since July! But, I am back now and will be posting along with the team every month on the 13th, as in the past!! 

Get ready for an even bigger shock...I created a 12x12 scrapbook layout for this month! As soon as I find my photo paper I will even add a photo to it! {smile}

I have some lovely photos from my son's wedding that might work on this layout, or perhaps one of my husband and me. We will see how I get along with printing some photos later this month. I have jury duty next week, so who knows what sort of crafty happiness I will be able to squeeze in! 

This is a 12x12 layout, created on heavy black cardstock. I used the Simple Stories Kissing Booth collection, which I purchased back in October. I made a vow to NOT buy any paper this year, but we all know my no spending vows are pretty worthless! 

I cut all the papers and chose a few embellishments from the collection pack. Then I went to my ribbon stash to see what ribbons would match. Sometimes that peachy pink color is hard to match, but I found several ribbons to work!

I matted all the paper layers with black cardstock, and also created a mat for a 4x6 photo. It was a lot of fun to try a 12x12 page. I have not made one for over a year! I do miss scrapbooking, but I still prefer mini books and cards to the large pages. Plus, It is impossible to actually put a page like this into a scrapbook. Way too dimensional! It is better as wall decor. 
For the RRR products I used, I wrapped the layout with 3/4" Pink Chevron Striped Twill. I also made a large bow from the same ribbon. Next I created two loopy bows from the 1/2" Pink Salmon Seam Binding. I glued the bows onto the layout with hot glue, shaping the loops as I glued them down. 

I decided that the bow need some roses for Valentine's Day! I used a Red 25mm Red Cottage Rose, Red and White Open Roses in various sizes, and also some Red Rose Buds. 
Thanks for joining me today! I am so happy to be back! Have fun hopping! 

Here is the RRR Blog Hop Order in case you get lost!
Really Reasonable Ribbon's Ramblings
Ginny
Gloria - YOU ARE HERE!
Kathy
Cheryl
Bonnie
Misty
Karen
Really Reasonable Ribbon's Ramblings


Really Reasonable Ribbon Supplies Used:
Bow making tools: Zutter Bow-it-All

Other Supplies Used:
Cardstock: ColorMates Smooth Black, Neenah Solar White
Paper: Simple Stories Kissing Booth
Adhesive: Art Glitter Dries Clear Glue, hot glue, foam tape
Other tools: paper trimmer, scissors, 1 1/4" circle punch

Monday, January 08, 2024

Welcome 2024!

Hello all my lovely readers and followers! It is a new year! New chances to craft and make and enjoy our hobbies! I am all about enjoyment this year. I have spent so many years on design teams, making things to a schedule and using products that I was asked to promote, that I am enjoying just making for myself! (I am not opposed to a new design team, but I will be careful what I choose.) 

My blog posting has been a bit sporadic, and my YouTube channel has been on hiatus for several years, but I am going to try to post more often to the blog, Instagram, etc. this year. I cannot promise I will revive the videos, but you never know! I have such a long list of things I wish to accomplish this year.

In fact, I have made several "bingo" boards listing "works in progress" projects (known as WIPs), and each month two numbers are chosen at random and those are the projects I will concentrate on. I hope to make progress on my stitching, coloring, and paper crafting projects this year by using this method.

Note: The stitching WIPGO concept was created by Jessie Marie Does Stuff. Visit her YouTube channel or the WIPGO 2024 Facebook page for more information. 

Plus, I want to try hand dying my own cross stitch fabric, and am joining Annette Green's group on FB to be inspired to create planner pages each week. I hope to share those pages monthly at least. I am still sorting that out. I have a lot of product to use up, a lot of things to accomplish, and I am enjoying just....crafting. Like in the "old days" before social media! That said, I do enjoy my various FB groups where we work toward a common goal or inspire each other in our makes! 

Here are a few things I have been doing the last few months.

I love to use old books in home decor. I also love to buy used books from Thrift Books dot com - to read! And the books are often hardback books. However, they are not always pretty or suitable to use for home decorating. But...if you cover them with scrapbook paper which matches your room's color palette...Ta Da! So I saved out a bunch of books from the "give away" box to cover with paper! These are for my living room. I have more that I want to cover to use for some of the upcoming holidays. And everyone knows, I have paper to spare! 

I also made about 40 Christmas cards and mailed them out. I am not sure how many more years I will tackle this job, I must be honest! I don't love making them enough to keep adding it to my list of things to do at Christmas time. As I get older, just decorating the tree and the house is a HUGE job for me. Then the un-decorating in January! 

However, I did use the Silhouette to address all my envelopes! I had tried it out by addressing my son and daughter-in-law's wedding announcements, and it worked so well that I decided to do it again for the Christmas cards! I was able to use Stampin' Up pens (which are older than my son who just got married!) to address the envelopes. It was so easy! 
Since I was on an assembly line card making kick, I also made a stack of masculine themed cards for my stash. I made birthday, Father's Day, graduation, and generic styles using my masculine papers! 

My kids informed me that I need wedding congratulations cards. My husband said I need some sympathy and get well cards aimed at men (he preaches weekly at his men's Bible group and there are a lot of older men who need a card sometimes). So I guess I have my orders!

I will be writing a stitching post and a coloring post later in the month to update you on those hobbies as well. I confess that most of my time lately is taken up with cross stitching! It was my original passion, and getting back into it after over 20 years has been such a blessing! I have some finishes to share for both coloring and stitching, so stay tuned for those posts. If I escape jury duty next week, I can work on blog posts! 

Happy New Year, my friends! My God bless you mightily in 2024!


Wednesday, October 18, 2023

Back from My Vacation...and a Wedding!

Hello, my Blogger friends! It has been a hot minute since I have been able to post! I went on a 16 day cruise vacation with my daughter to the British Isles, and it took me forever to get re-acclimated once I got back!

We had a wonderful time together. This is us getting ready to board Celebrity Apex in Amsterdam. It was a long, horrendous flight to get there, however! I flew Los Angeles to San Francisco to meet up with Laura, then we flew together to Amsterdam. It was 12 hours of whining. (ha ha ha) 

Laura hamming it up at Corfe Castle in Portland (Weymouth), England. We had unseasonably hot weather for most of the trip! We had packed for cool, rainy weather! What gives?! 

Here we are at Blarney Castle in Ireland. We did NOT kiss the stone! There was a huge long wait time, and we needed to get back for our bus, plus we do NOT need to have more "gift of gab"! It was another very warm day!
Here we are in Betws-y-Coed, Wales. I wanted to move there immediately! Out of the 9 ports of call this was my absolute favorite day.

Edinburgh, Scotland at the Royal Mile and Edinburgh Castle. Another, VERY warm day! We walked almost 13,000 steps this day! Uphill, both ways! We were exhausted. But, seeing all of this history was AMAZING! 
My turn to ham it up on Western Shetland, Scotland. What is funnier than putting bunny ears on a...bunny!??? This was our first cool day! It was wonderful. I loved our brief tour of Shetland, along with the little museum that detailed much of the WWII history of this area.
This was our last day, Dunrobin Castle, Scotland. Another cool day. Despite both of us coming down with a cold, we had a wonderful day touring the castle and grounds. 
Our visit to Dunrobin Castle was fantastic. It is still a residence as well as a museum, so many things were intact and it was such a pleasure. The grounds reminded me of Versailles! 

I adore my daughter, who is just turned 28. We love to hang out together, laughing and talking, and just egging each other on to silliness. The trip was rough at times, starting with the long flights, and with Laura getting a bit seasick and me having lots of pain from my arthritis, then both of us catching a terrible cold...but we just sucked it up and enjoyed every bit of it! We are already planning our next adventure...maybe in 10 years when we recover and save up enough cash! (smile)

The other reason that I have not been able to make or post anything new is.....
My youngest got married October 14! Jonah and his lovely wife Diana were married by my husband in our backyard in a small, family ceremony! We are so happy to welcome Diana into our family!
Laura, Me, Allana (Diana's sister), Nathan, Matt, Mike (Matt's brother), and in front Diana and Jonah. 
It was a lovely day with a lunch, then the ceremony, then cake and mock champagne while opening gifts, then a fancy dinner at a local restaurant. The newlyweds were not taking a honeymoon as Jonah's job and Diana's college classes did not permit it, but they are going to Alaska with Matt and me and Jonah's siblings in August 2024, so they can honeymoon then! (smile) 
We tried to teach our children that the wedding is not the important part, but that the marriage is what is important. Jonah and Diana embraced that philosophy by choosing to have a very small event, and instead save for their future. We wish them every happiness and the joy of the Lord in their marriage!

Now, a little announcement...I have once again stepped back from my few design team commitments. I just need some space to figure out what I want to do regarding the blog, my crafting endeavors, and so forth. My husband has taken on a new job with more responsibility and travel (and stress), plus we are both trying to lose weight. Which at my age is not easy! It is basically a full time job! I have lost 13 pounds so far, but I am trying to lose 60 pounds total before we take our vacation to Alaska in August 2024.

I hope to still be in the craft room making and  posting, but it will be for myself...just for fun. I love sharing with all of you Dear Readers, but I just don't have the bandwidth to be tied to deadlines and many projects per month. Plus, I am really working on some cross stitching projects, which take far longer than making a card, or even a mini album! 

I plan to be back soon! Stay tuned!